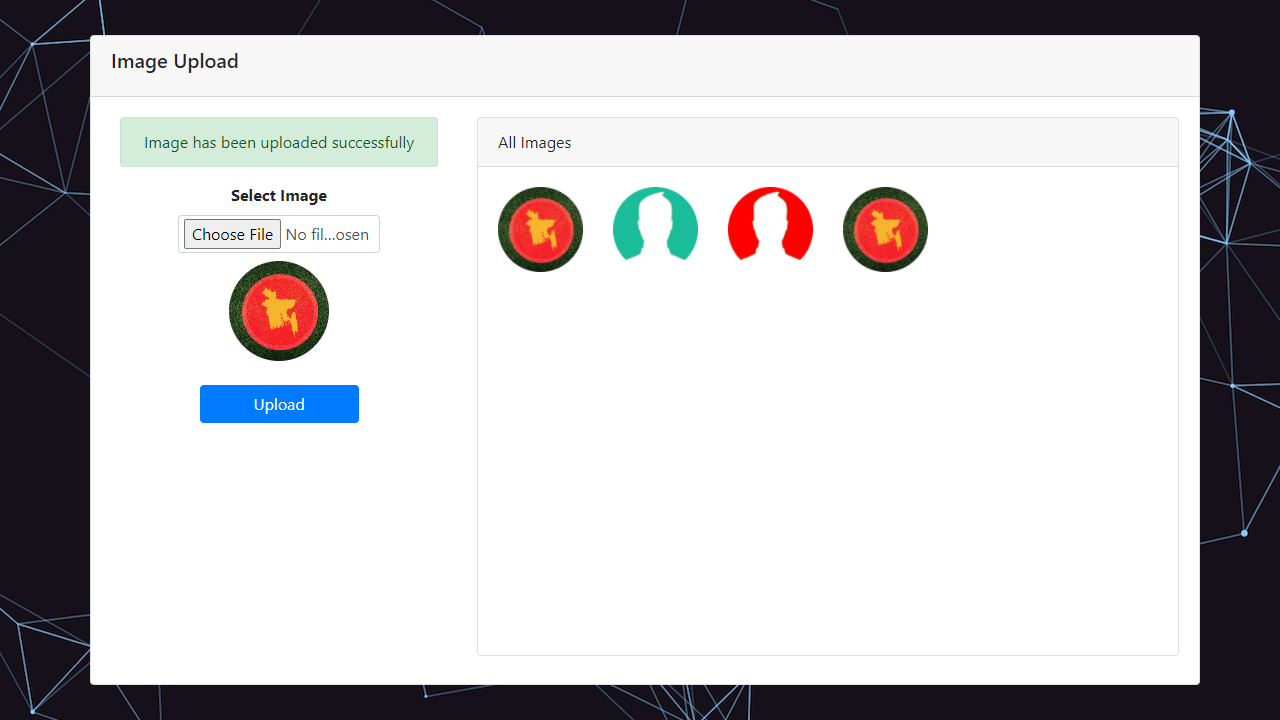
Laravel Livewire Image Upload with Preview
LARAVEL
LIVEWIRE
Video Tutorial:
Hello friends, in this blog, we would like to show you laravel 8 livewire image upload with preview example. We will give you simple example of how to upload image with preview in laravel 8.
So, let's follow few step to create example of laravel 8 livewire image upload with preview tutorial.
You just need to follow few step and you will get basic crud stuff using livewire component, model, route, bootstrap 4 and blade.
Now lets start,
Step 1: Create Laravel 8 Project
composer create-project --prefer-dist laravel/laravel LivewireImageUploador,
laravel new LivewireImageUploadStep 2: Install Livewire in this Project
composer require livewire/livewireStep 3: Database Configuration
Now we will make database configuration for example database name, username, password etc for our crud application of laravel 8 livewire. So let's open .env file and fill all details like as bellow:
.env
DB_CONNECTION=mysql
DB_HOST=127.0.0.1
DB_PORT=3306
DB_DATABASE=nzcoding_livewireimageupload
DB_USERNAME=root
DB_PASSWORD=
Step 4: Make Student Model & Migration
php artisan make:model Image -mgo to database/migrations/image_table_migration & in up() function add the code
Schema::create('images', function (Blueprint $table) {
    $table->id();
    $table->string('image')->nullable();
    $table->timestamps();
});
Now, migrate the migration
php artisan migrateStep 5: Make Livewire Component
make base layout component
php artisan make:livewire layouts/basemake ImageUpload Component
php artisan make:livewire ImageUploadComponentStep 6: Add Get Route
Here, we need to add get route for image upload application. so open your "routes/web.php" file and add following route.
routes/web.php
use App\Http\Livewire\ImageUploadComponent;

use Illuminate\Support\Facades\Route;


Route::get('image-upload', ImageUploadComponent::class);
Step 7: Filesystems.php Configuration
go to config/filesystems.php and change your local disk path
'local' => ['driver' => 'local','root' => public_path('uploads'),],
Step 8: Add the Following Codes
Now, let's copy bellow code and put on StudentsComponent files,
resources/views/livewire/layouts/base.blade.php
<!DOCTYPE html><html lang="en"><head><meta charset="UTF-8"><meta name="viewport" content="width=device-width, initial-scale=1.0"><meta http-equiv="X-UA-Compatible" content="ie=edge"><title>NzCoding - Laravel LivewireCRUD</title>{{-- Bootstrap Styles --}}<link rel="stylesheet" href="https://cdn.jsdelivr.net/npm/bootstrap@4.6.1/dist/css/bootstrap.min.css">{{-- fontawsome css --}}<link rel="stylesheet" href="https://cdnjs.cloudflare.com/ajax/libs/font-awesome/4.7.0/css/font-awesome.min.css" />@livewireStyles</head><style>body{background-image: url('assets/images/bg01.png');}</style><body>{{ $slot }}{{-- Bootstrap Scripts --}}<script src="https://code.jquery.com/jquery-3.6.0.min.js"></script><script src="https://cdn.jsdelivr.net/npm/popper.js@1.16.1/dist/umd/popper.min.js"></script><script src="https://cdn.jsdelivr.net/npm/bootstrap@4.6.1/dist/js/bootstrap.min.js"></script>@stack('scripts')@livewireScripts</body></html>
app/Http/livewire/ImageUploadComponent.php
<?phpnamespace App\Http\Livewire;use App\Models\Image;use Carbon\Carbon;use Livewire\Component;use Livewire\WithFileUploads;class ImageUploadComponent extends Component{use WithFileUploads;public $image;public function mount(){}public function updated($fields){$this->validateOnly($fields,['image' => 'required',]);}public function uploadImage(){$this->validate(['image' => 'required',]);$image = new Image();$imageName = Carbon::now()->timestamp. '.' .$this->image->extension();$this->image->storeAs('image_uploads', $imageName);$image->image = $imageName;$image->save();session()->flash('message', 'Image has been uploaded successfully');$this->image = '';}public function render(){//Get Uploaded Images$images = Image::orderBy('id','DESC')->get();return view('livewire.image-upload-component',['images'=>$images])->layout('livewire.layouts.base');}}
app/Http/livewire/ImageUploadComponent.php
<div><div class="container mt-5 pt-5"><div class="row mt-4"><div class="col-md-12"><div class="card" style="height: 70vh;"><div class="card-header"><h5 class="card-title">Image Upload</h5></div><div class="card-body"><div class="row"><div class="col-md-4 pl-4 pr-4 text-center">@if (session()->has('message'))<div class="alert alert-success text-center">{{ session('message') }}</div>@endif<form wire:submit.prevent="uploadImage"><div class="form-group"><label for="image" class="font-weight-bold">Select Image</label><div class="row justify-content-center"><div class="col-md-8"><input type="file" class="form-control" wire:model="image" style="padding: 3px 5px;" /></div></div>@error('image')<span class="text-danger" style="font-size: 11.5px;">{{ $message }}</span>@enderror<div wire:loading wire:target="image" wire:key="image"><i class="fa fa-spinner fa-spin mt-2 ml-2"></i> Uploading</div>{{-- ImagePreview --}}@if ($image)<img src="{{ $image->temporaryUrl() }}" width="100" alt="" class="mt-2">@endif</div><div class="form-group text-center"><button type="submit" class="btn btn-primary w-50 mt-2"><div wire:loading wire:target="uploadImage" wire:key="uploadImage"><i class="fa fa-spinner fa-spin"></i></div> Upload</button></div></form></div><div class="col-md-8"><div class="card" style="height: 58vh;"><div class="card-header">All Images</div><div class="card-body">@if ($images->count() > 0)<div class="row">@foreach ($images as $image)<div class="col-md-2 mb-4"><img src="{{ asset('uploads/image_uploads') }}/{{ $image->image }}" class="img-fluid" alt=""></div>@endforeach</div>@else<div class="row"><div class="col-md-12 text-center">No Image Found</div></div>@endif</div></div></div></div></div></div></div></div></div></div>
Now we are ready to run our the application. So run bellow command for quick run:
php artisan serveNow you can open bellow URL on your browser:
http://localhost:8000/image-uploadThanks for reading this post
I hope it can help you....


Comments (1)
HI again, may I request for a tutorial on how to upload and download a file? example is pdf file. :)
Leave a Comment
You need to login to post a comment
Login to Comment